The business world can change at any moment, as recently proven with the mass-market drop of ChatGPT and AI initiatives. The need for companies to maximize efficiency and streamline operations has never been greater. The ServiceNow platform has emerged as a powerful tool in helping companies achieve this goal.
In this blog, I will delve into the strategic use of actions and flows in ServiceNow for managing inbound emails. Whether you’re in IT seeking to streamline incident management or a business leader aiming to scale your customer support, continue reading as I explore how ServiceNow can elevate your organization’s operational efficiency to new heights. And, how to configure your system to use email actions and flows.

No thanks, I prefer my inbox.
…said no one ever who used a shared inbox to perform work. It is incredibly important to remember that in order to grow your business, you need to offer the best experience for customers and employees alike.
The first step to improving customer service is to identify pain points and ways to resolve them. In particular, around the use of inbound emails. Whether they are internal employees, automated systems, clients or techs they all desire the same thing: a transparent, visible response to their inquiry being made and reporting insights for clients and employees.
Below is a sample of 12 strategic ways to improve, or enhance, your existing customer/employee service process by using ServiceNow:
- Automated Email Routing:
- Implement automated rules and workflows to route incoming emails to the right support teams or individuals based on keywords, sender information, or other criteria.
- Use ServiceNow’s Email Processing and Notification features to trigger incidents, create tasks, or update records automatically.
2. Email Classification:
- Use natural language processing (NLP) and machine learning to classify emails into predefined categories (e.g., sales, support, billing).
- Leverage ServiceNow’s Predictive Intelligence capabilities to improve email categorization accuracy over time.
3. Email Templates:
- Create standardized email response templates for common inquiries or issues. This ensures consistency in communication and saves time.
- Use variables to personalize templates with customer-specific information.
4. Service Catalog Integration:
- Connect incoming emails to your ServiceNow Service Catalog, allowing customers to request services via email.
- Implement a self-service portal where customers can check the status of their email-generated requests.
5. Knowledge Base Integration:
- Integrate your knowledge base with ServiceNow so that email responses can include relevant articles and FAQs, enabling customers to find solutions on their own.
6. SLA Management:
- Set up Service Level Agreements (SLAs) for email response and resolution times.
- Use ServiceNow’s SLA monitoring and escalation features to ensure timely responses to emails.
7. Prioritization and Queues:
- Establish email queues for different types of requests or issues.
- Prioritize emails based on urgency and impact to address critical matters first.
8. Collaboration and Assignment Rules:
- Implement collaboration tools within ServiceNow to facilitate internal discussions and information sharing among support teams.
- Define assignment rules to distribute email tasks evenly among team members.
9. Performance Metrics and Reporting:
- Monitor email response times, resolution rates, and customer satisfaction.
- Generate reports and dashboards in ServiceNow to track the performance of your email management process and identify areas for improvement.
10. Customer Feedback Loop:
- Encourage customers to provide feedback on email interactions.
- Use feedback to continuously improve the quality of responses and overall customer experience.
11. Security and Compliance:
- Ensure that email management processes comply with data protection regulations and security standards.
- Use ServiceNow’s security features to protect sensitive customer data.
12. Continuous Improvement:
- Regularly review and refine your email management strategy based on data and customer feedback.
- Stay updated with ServiceNow enhancements and new features to optimize your email handling processes.
In addition to the items above, you can use ServiceNow to route emails based on skill set, queue load and even assignment schedule (although that is part of #8).
Ready. Set. Go.
Utilizing the out of the box inbound email actions or flows, departments can now optimize their employees time, and plan to scale customer service teams easily.
A common problem that often occurs in customer service is the use of alias emails and distribution lists to a team. An email comes into your inbox, and everyone goes to working the support for a team issue. At first, this would work — but over time as you want to scale and grow, this setup is no longer efficient. You can’t have everyone on the team working the same email with no visibility and no way for managers to assist agents!
And let’s take it a step further — now you have the email, but who is the best agent to take the email or the best team? What skillset is the issue about? Who was the last person to help them? What if the email comes from the website through a forward — has this been an issue before?
And here is another question — what about priority? Is this a VIP? A client that is very large has an incident that needs to be resolved, but then your agents are working on lower priorities instead because of the support email inbox. That is definitely not good customer service!
But, no worries! ServiceNow has you covered.
It is important to note that ServiceNow supports only **one** active SMTP account at a time (for outbound emails). What does that mean? It means that if you use ITsupport@yourcompany.com for IT and then you scale the platform to other departments such as HR, or Customer Service, and each wants to have their outgoing emails come from hr.support@yourcompany.com and/or csm.support@yourcompany.com (and not ITsupport@yourcompany.com)— you can’t.
All outbound emails would come from ITsupport@yourcompany.com. [Inbound emails can be as many as needed]. For most HR and CSM teams this is not an issue because you would swap the SMTP email to something more generic, then each inbound employee/user is allowed to have an email that can create what they need.
Why only one outbound? I would need one of the ServiceNow MVP’s to tell us. The literal answer is that it’s not architecturally possible, but the reason why ServiceNow has never made a move to allow for it, I am not sure.
Inbound Emails: Actions and Flows
Right out of the box, inbound email action and flows allow the system to automatically send replies, create incidents, cases or update records in response to the email.
With a little bit of configuration you are able to get out of the inbox, get the correct group or person assigned to the case and begin to plan on how to scale your team to best serve the inbound volume.
IT can have their incidents, agents and teams can have their cases and managers can have their SLA’s and transparency into issues, bottlenecks and other important blockers to delivering excellent service.
How it Works
When a 3rd party sends a new, forwarded (inbound properties: fw:,fwd:) or a reply (inbound properties: re:,aw:,r:,Accepted:,Tentative:,Declined:,Case:) to the instance, the email is received, the system ‘classifies’ the email as a forward, reply or new (type of email). You can even add additional properties if needed.
The high level processing of inbound emails is as follows — NOTE the ‘flow’ comes BEFORE the ‘action’ on the bottom right:
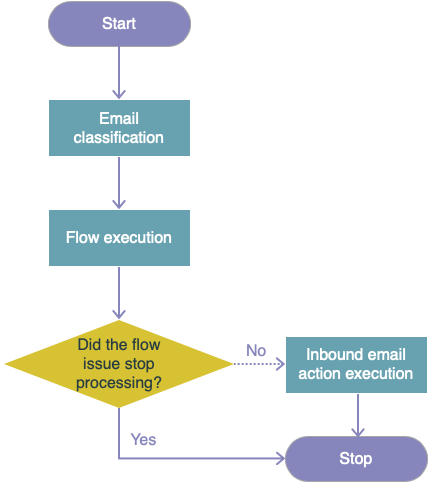
In ServiceNow there are currently 2 ways you can set this automation up:
- Actions — similar to business rules, they are the traditional scripted/filtered way to take action on a target table when the conditions are met; these run AFTER flows. Go to System Policy > Inbound Actions to see the entire list.
CSM: note that this uses conditions that call properties on the admin page, we will look at that later on

ITSM:
- Inbound email flow — this is the latest/preferred way to trigger the same functionality as an action; this also takes priority over actions and will trigger first (which means it could block email actions); in CSM/FSM you are taught to use the inbound email FLOW over actions in the implementation course
CSM Inbound Email Flow: NOTE it uses a sub-flow for users. DO NOT modify the sub-flow. Copy it and use it as needed.
Actions vs Flows: which one is better to use?
I get asked this question a lot, and the truth is: it depends. ServiceNow wants users to use the flow designer and get used to working with flows and sub-flows. The ultimate reason though for moving towards the flow designer is that it allows business managers, for example, to easily set up their own flows and sub-flows for their business needs without requiring technical assistance. It helps put ownership back into the business departments and off the shoulders of the IT department.
The traditional actions are more like business rules, they require system knowledge of processing order, scripting and often times access to system properties to update conditions. Often, admins and developers will just instinctively use actions and not flows.
However each option works. I recommend moving as much as possible towards inbound email flows. Not just because ServiceNow says so, but because inbound flows are actually a lot easier to use and troubleshoot (so it can save even the developers time). Visually they are intended for low-code users, and more tech savvy business users, to configure and build for their own purposes. It natively has a way to “recycle” repeatable actions (such as the user lookup for and record match for CSM accounts and teams— imagine having to set that code/condition up EACH TIME you needed an inbound setup — yikes!!)
If you are using CSM and FSM — the implementation course actually tells you to use inbound email flows that are out of the box and readily available over setting up and using actions.
Let’s get to it: How do I set up the inbound email?
For today’s tutorial I am going to use the out of the box (OOTB) options for ITSM and CSM to create an incident and then also a case. I will also go over making sure to set up your email account(s), but not in depth.
Pre-requisite: make sure email is set up
If you are using your PDI, you will need a custom email to use for smtp/IMAP/pop setup. I am covering inbound today, but if you want to play with replies, forwards, etc you will need both set up.
In my example, I use a company called namecheap.com and I use the starter package email (FYI this is not an affiliate link, I have several domains with this company. It’s a solid source).
NOTE: For Enterprise companies, I suggest you use the Microsoft Graph and move to the cloud. Your security team will likely already be moving towards that anyway.
HOWEVER — for demonstration purposes on this blog, I am simply using a basic email setup.
Comment on LinkedIn or Youtube comments if you want a video for setting up the Microsoft Graph with ServiceNow.
Inbound Email Action: ITSM — Create an Incident
In the ServiceNow ITSM module, incident fulfillers can easily have incidents created and email information automatically added to the incident for the fulfiller.
Out of the box, ITSM fulfillers can take advantage of using the inbound action ‘Create Incident’.
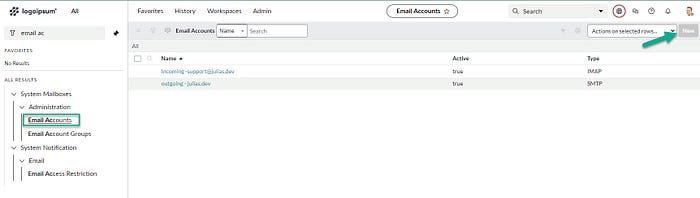
- In the left filter nav, go to System Mailboxes > System Policy > Inbound Actions
- Search and locate the ‘create incident’. Make sure that it’s on the [incident] table (there may be other ‘create incident’ actions on your instance)

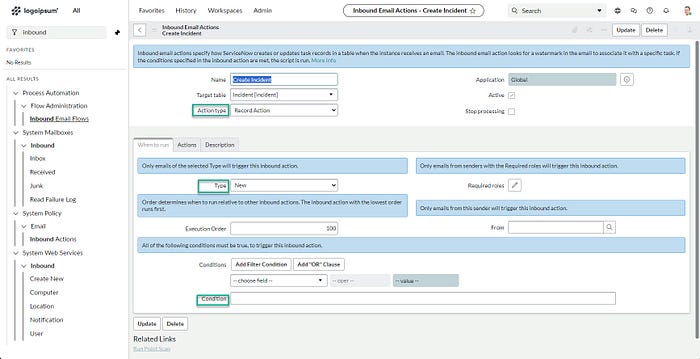
3. Open the ‘create incident’ action and examine each section.
4. On the ‘When to Run’ form view / section you will not change anything. Everything should default as it is OOTB below:
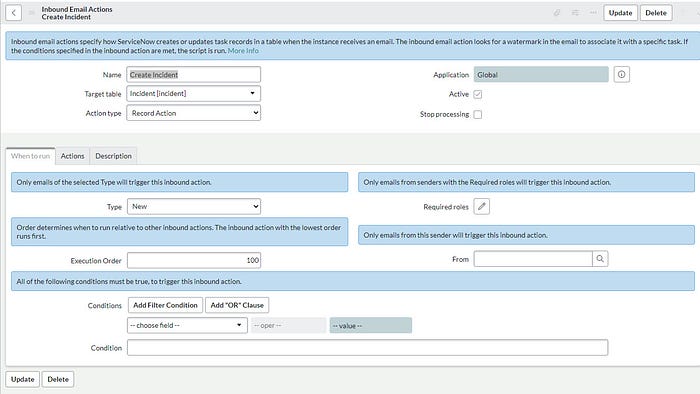
5. Click on the ‘Actions’ tab form view/section and note there are no field actions and a box for script.
Pause here before you go to edit that code. You don’t have to. If you are simply trying to create an incident and assign it to a support group — all you need to do is above the code box where it has ‘Field Actions’ update that filter to say:
- [ Assignment Group ] [ To ] [ your group ] — replace your group with the filfillment team, in my example I used ‘Help Desk’
- [ Impact ] [ To ] [ 2 — Medium]
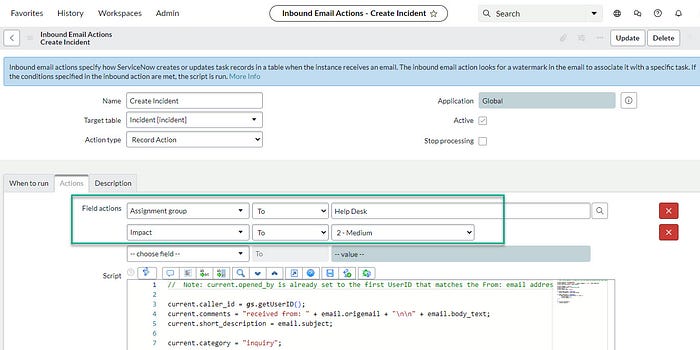
For field actions you can set whatever options you need. I chose impact for demo.
6. Now simply press ‘update’ and it will return to the list view.
Since this is a OOTB action, if you see oddities with your instances existing action, such as a lot of additional code or boxes checked on the form views — simply go to developer.servicenow.com and check out the OOTB ‘create incident’ action version on your PDI.
7. Let’s test. I am going to email my support email, and see what happens on the inbound now that I set up my assignment group and impact above.
The only expectations I have at this time, is that when the email comes in:
- The email box — it works and is received
- That the assignment group is ‘help desk’
- That the impact shows up as ‘2- medium’
8. Navigate to the incident list > all and sort by ‘created’ — look for the email subject that you just sent and open the form
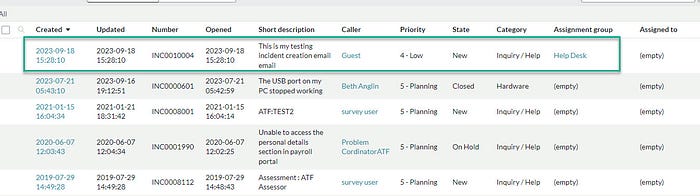
9. Notice on the form the defaults for the fields. Also notice that the assignment group is ‘help desk’ and the impact is ‘2 — medium’.
But what about all the other fields? What about the fields in yellow?
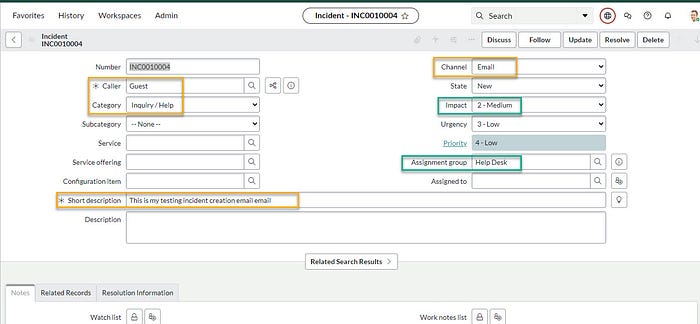
The yellow fields below are actually being set in the out of the box script on the inbound action. Out of the box, any caller who is not a user will be set to ‘guest’.
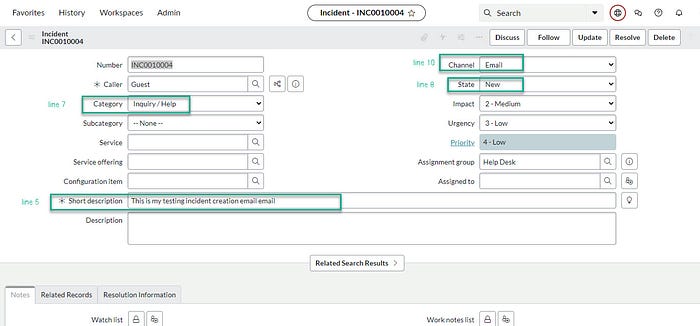
If we return to the inbound action > create incident > ‘actions’ tab and scroll to the code we can examine what it’s doing.
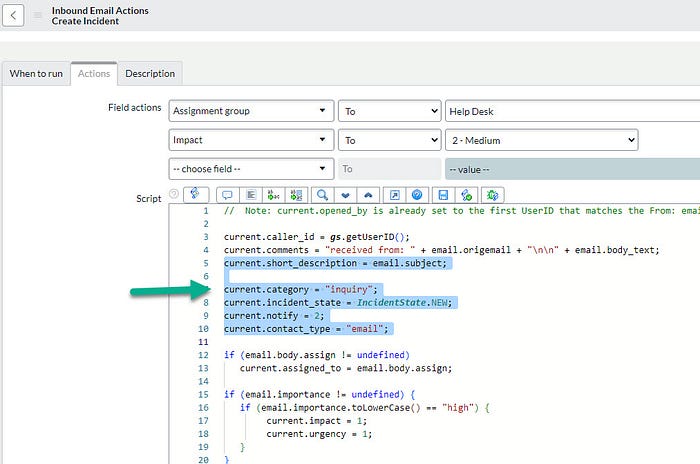
If you read the code in blue, line 5 — it’s saying ‘grab the email subject and put it in the short description box on the incident’ and it did that.
Line 7 is saying ‘hey set the category to ‘inquiry’ and it did. If you change your categories you will need to update the script here.
Line 8 is setting the incident state to ‘new’ (as opposed to in progress, etc)
How to add additional options to the script?
Don’t. Don’t go seeking script options when you have a field action dropdown right there on the inbound action.
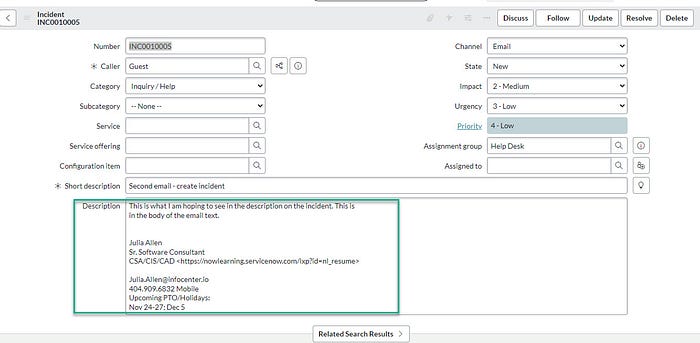
For example, what if I wanted to add the body of text in the email to the description field on the incident?
- Navigate back to the inbound create incident action.
- Update the ‘Action’ tab ‘Field Actions’ so [ Description ] [From email] [ Body(Text)] and press ‘update’
- Test by sending a email to the support email. Note the ABOVE incident has no description text but BELOW it now does
The whole point of inbound email is to MAKE IT EASY to own, troubleshoot and provide support for. If you don’t need to add additional code to maintain or require developers on staff TO maintain the system — then don’t. Go low code. Save your developers for the bigger stuff and don’t bog them down with hundreds of (avoidable) little ankle biters of code to maintain and troubleshoot.
Inbound Email: Inbound Flows
Going back to the low code theme, we see the use of inbound EMAIL flows in ServiceNow. Coming from the ITSM side of the house, I am mostly used to seeing actions.
However, Customer Service offers out of the box inbound email FLOWS that take priority OVER actions in execution order and creates a much easier visualization of the inbound process to set up. Not to mention, you can delegate access for flow designer and business process owners and managers can learn how to create their own flows (use role ‘flow_designer’).
In CSM you need to do 2 things for inbound case creation to work:
- Define rules to create the cases
- Assign cases to specific teams
Let’s examine CSM ‘create case from email’ flow.
- Navigate to the ‘inbound email flows’ via the navigator
- You will probably only see a handful of email flows out of the box, if you clear the filter you will see roughly 177 options
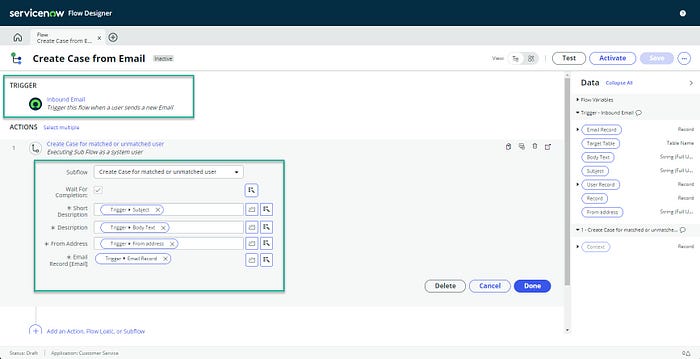
- Locate the ‘create case from email’ flow and open it
- In the trigger section, expand the ‘Inbound email’ by clicking on it and notice the very similar fields. You see ‘Email conditions’.

5. Note in the ‘actions’ section, out of the box it uses a sub-flow for ‘create case for matched or unmatched user’. This sub-flow is used by flows, so don’t modify this without cloning it.
6. In the CIS-CSM campaign course example, we go over how to update the sub-flow and add a product to it — so that is what we will also do here since this example is a very, very commonly used one, and is one everyone should know how to set up (so common I am surprised it’s not already out of the box there).
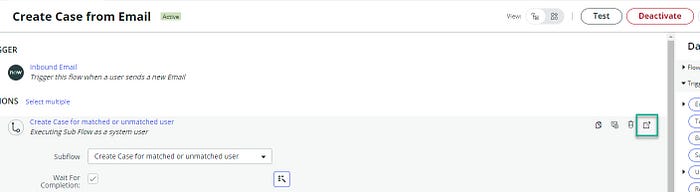
On the main ‘create case from email’ flow, expand the ‘actions > create case for match or unmatched user’ and click on the right side arrow pointing to outside the box. It will open a new window.
Keep in mind that in CSM you have ‘Customers’ and ‘Consumers’.
7. Review the sub-flow actions list and simply review/mentally note there are if/else checks. The first check is looking to see if the user is a ‘Consumer’ and if they exist what to do, if the user does not exist the else statement tells it what to do. Then, it looks up to see if the user is a ‘Contact’ that exists or not, and what to do.
Expand (in the actions) one of the ‘Create Case’ actions and note the case fields. This is the data that “feeds” the main flow. This is where it comes from. If you update this, update it on all the used if/else case actions.
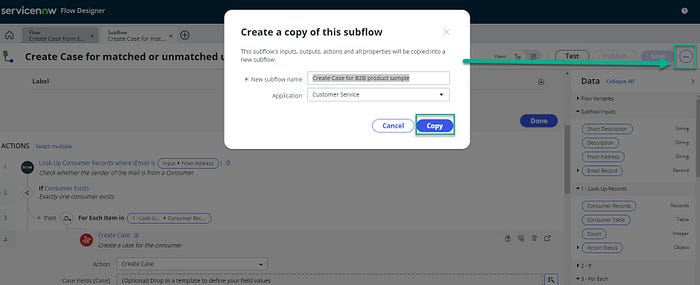
8. In the example, we add the ‘product’ to the sub-flow. So, on the 3 dots on the top right (next to ‘save’) > ‘Copy sub-flow’ and name it anything, ‘Create Case for B2B product sample’ and choose ‘Copy’
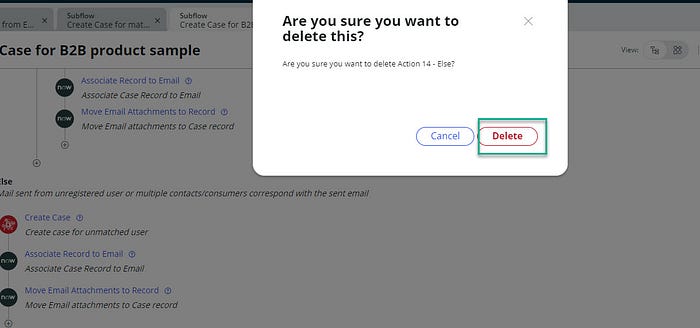
9. You want to modify and only use actions that are relevant to your sub-flow. For example, there won’t be any unregistered users — so hover over the ‘else — mail sent from unregistered user or multiple contracts/consumers correspond with the sent email’ and press the ‘trash can’ on the right side and then press ‘delete’ on the window
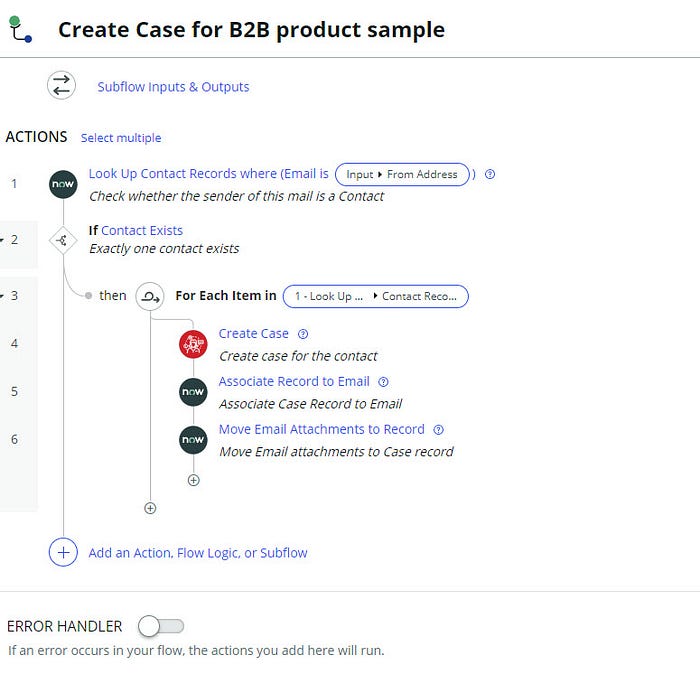
10. The next step is to ‘drag and drop’ the ‘Look Up Contact Records where (email is).. to the #1 position on the actions list — so drag it to the very top. Hover over the far left number (in this case #8) until a very faint handle appears that looks like 2 columns of dots. Press and hold the ‘dots’ and drag it to the very top. Also drag the ‘iteration of the then statement’ and place it under the look up. It should appear as below:

11. Now delete the ‘consumer logic’ from the sub-flow. You will not *always* do this but in the example, we are not dealing with selling products to a consumer. If you have that scenario where you do sell to consumers, leave this logic.
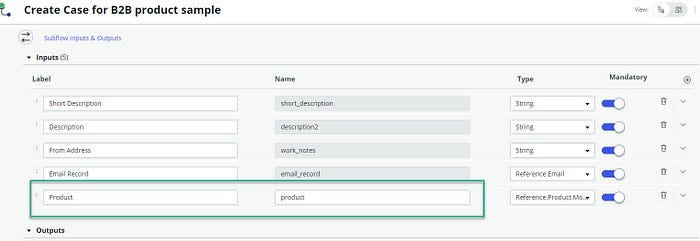
12. Create a new input field at the very top of the sub-flow in the input section. Do this by pressing the (+) on the top right next to mandatory. Since we are using product, type the word product and in ‘type’ choose ‘reference’ and then locate the product model so it shows as reference.product model. Press ‘done’
In the real world, this can be anything not just product. Product is the most common example, but you can reference anything here needed. Think over other setups and examples where this can be applied.
13. Now go to the ‘create case’ and expand it. Add the ‘Product’ case field at the very bottom under ‘channel’. Using the data pill picker > subflow inputs > product

14. Save AND publish the sub-flow. Now we need to re-connect the new sub-flow to the main ‘create case via email’ flow.
15. Per ServiceNow, we want to actually duplicate the original flow — just go to the 3 dots on the far right side > copy flow. Name it what you want, I am calling mine ‘Create case from email for product support’
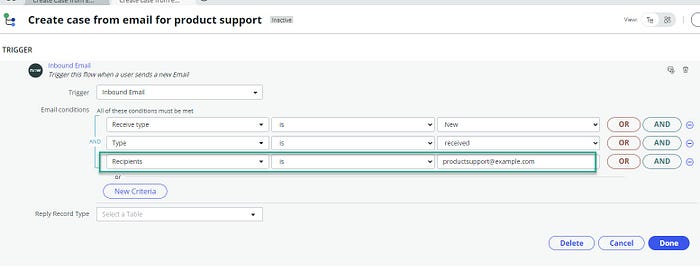
16. On the new flow, we need to modify the trigger. In our example we have a product with a support email. Add the support email. If you have multiple support emails, add them here or in the flow.
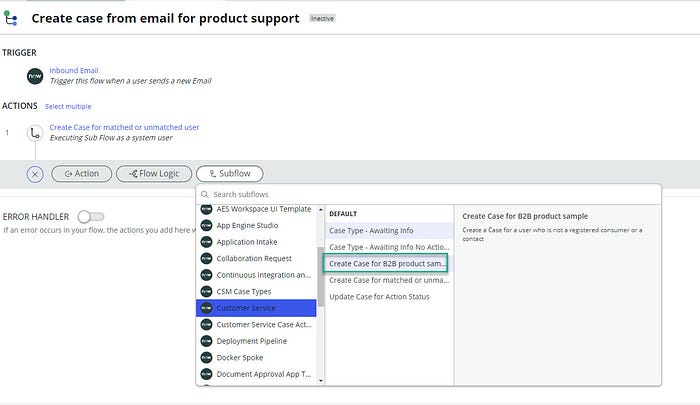
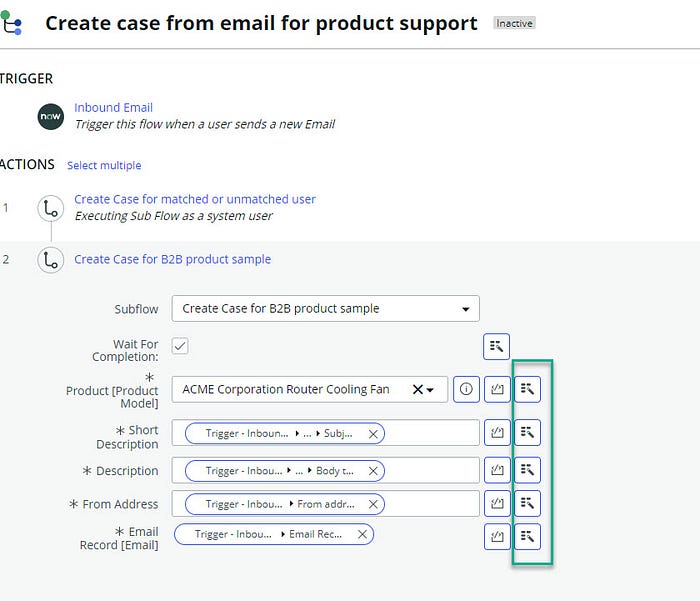
17. Now we have to re-associate the NEW sub-flow to the NEW flow. Below the existing one, choose ‘sub-flow’ > go to ‘Customer Service’ > name of your sub-flow mine is ‘create case for b2b product sample’
18. Now fill in the required inputs. Use the data pill picker for each item except the product.
- Specify a product – you need to make sure you pick a product that has a support email or create one, so I am going to pick ‘ACME Corporation Router Cooling Fan’
- Short Description — Using the data pill picker, make sure you go to trigger inbound email > email record > subject
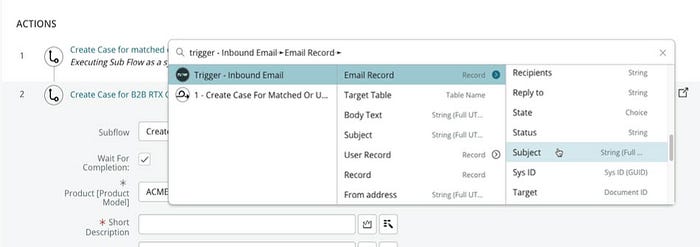
- Description — using the data pill picker, go to email record > Body text
- From Address — using the data pill picker go to the trigger > ‘From Address’ (it’s below the ‘email record’ option in the list in the second pane)
- Email Record — using the data pull picker go to just ‘trigger > email record’ in the second pane
19. Delete the OLD logic on your NEW parent flow (aka the ‘create case for matched or unmatched user’. The Save and Activate the flow.
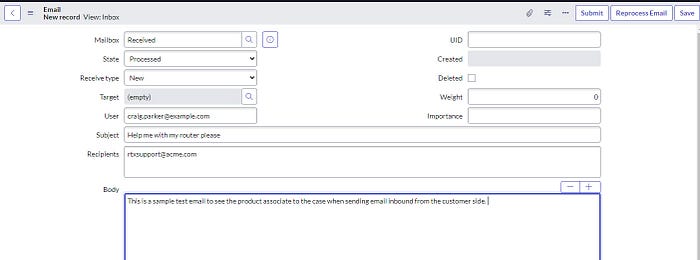
20. Testing. We need to set up, or trigger, an inbound email so it processes. Go to ‘Email client > received’ and set up a new email trigger.
Go to ‘received’ and ‘new’ and set up the email as follows:
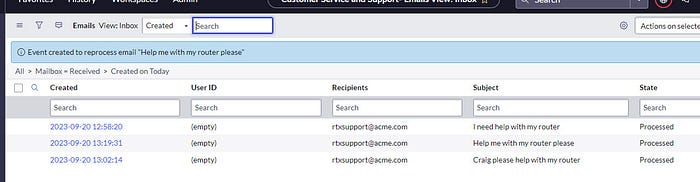
21. Press ‘Save’ and then ‘reprocess email’ and you will see a blue alert appear saying it’s triggered the flow
22. Re-open the email and look at the ‘target’ field and make sure it’s filled out. Then click on the ‘i’ icon and go to the case.
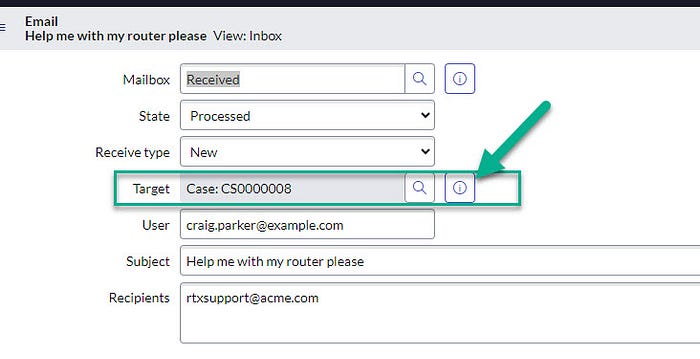
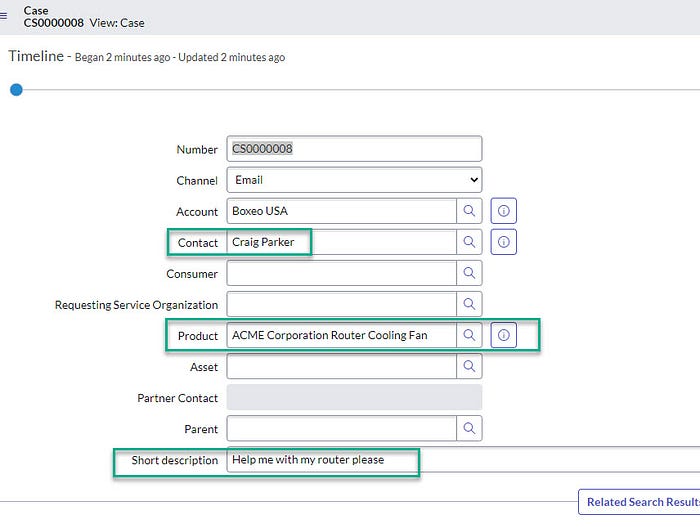
23. On the case form, note that the product auto-populates and the other fields from the variable list on the flow are there. Such as the subject, contact, account and any other ones you added to the updated flow.
Wow. That was a lot of information. You’re ‘killin me’ Julia!
I don’t blame you if you feel a little overwhelmed. It’s ok. It’s normal. Keep in mind that this is still low-code, not “no code”. In fact if you are reading this, you get accolades for reading to the very end. Most people will never see this line of text because they already gave up. Imagine how their life is if that’s all it takes to lose interest or move on to a new thing? Crazy. Anyway — back to the topic.
Setting up the inbound email flow takes time, consideration and testing. All the “dominos” need to be ready to fall in the right place at the right time.
If you are a entry level developer, admin or general business user it is 100% ok to feel out of water right now. Do. not. give. up. I promise, if you keep at this, it will all click. It is an ENTERPRISE system — that means it IS a complex system that takes time to learn.
That is why having a strong, well thought out inbound email strategy is critical to the success of your department and the product.
In this blog, we reviewed:
- 12 strategic ways the ServiceNow software could improve your customer and employee services
- We went over how 2 products (ITSM and CSM) could utilize inbound emails that are in alignment with that strategy
- We set up inbound actions for those products
- And we discussed how this product takes time to learn, and not to give up
I hope you take this blog knowledge and utilize it as a small starting point, or the first step, in elevating your organization’s operational efficiency to new heights.
Resources for more information and practice
- NowLearning — Customer Service On-Demand Implementation (paid)
- Developer.servicenow.com — inbound email action and flow (free) courses but you might have to do some earlier courses so the action/flows will work properly according to the documents
- ServiceNow — automating system responses to inbound email
- Troubleshooting KB — Inbound Email overview and troubleshooting
- Troubleshooting KB — Inbound email FAQ
Discover more from Julia's Dev
Subscribe to get the latest posts sent to your email.
